Wednesday, November 27, 2013

Artsy Wednesday: Polka dots

Today nails were kinda inspired by a Kate Spade phone case I saw and loved:


It's very simple, but I was just in the mood from something simple this week. I used Wet n Wild French White Creme for the base, and OPI Designer De Better for the polka dots and accent nail.

Check out the other girl's manicures:


Wednesday, November 13, 2013

ARTSY WEDNESDAY: White nails

This week's theme was white. I did a white and silver manicure using striping tape. I used OPI Designer De Better and Wet n Wild French White Creme. This was definitely pretty time consuming, but I think it was worth it:


Check out the other girl's manicures:


Wednesday, October 16, 2013

ARTSY WEDNESDAY: Crystals

This week's theme was crystals. I did a saran wrap manicure using Wet n Wild Tickled Pink and BK Neon Luminous Glow in #13. I did a coat of the BK polish, and then did a coat of the Wet n Wild polish. While the Wet n Wild one was wet, I dabbed saran wrap in it. After this dried, I added the crystals.


Check out the other girl's manicures:


Wednesday, October 2, 2013

ARTSY WEDNESDAY: Disney-Inspired Nail Art

I was running a bit short on time this week, and so I couldn't spend as much time on my nails as I would've liked to. I didn't really have a good reason for doing 101 Dalmatians-themed nails; I just saw Sally Hansen Diamonds and Rubies in my nail polish stash and thought that it was the perfect "101-Dalmatians red."


I used Diamonds and Rubies as my base and then covered it with one strip of striping tape to make the red stripes on my nails. I used Wet n Wild French White Creme as the white and a Sharpie for the black spots. I covered my nails in PVA peelable base coat to prevent the sharpie from smudging [thanks for the tip Michele], and then used top coat. I'm not happy with my NYC top coat right now because there have been bubbles on my nails the last couple of times I used it. I'll need to find a new top coat. Any suggestions of good drugstore top coats? Should I just go with Seche Vite?

Check out the other girl's Disney-inspired manicures:


Wednesday, September 25, 2013

TUTORIAL: How to do Splatter Nails WITHOUT Blowing Through a Straw!

I really wanted to rock a splatter mani, but every time I try the blowing through a straw method my nails just look like a hot mess. I tested two methods to see if there was another way to do splatter nails.

Here's my best result:


I used Revlon Minted as the base and black and white acrylic paint for the splatter. I did this using an old toothbrush:


First, I put Vaseline all over my hands so the splatter wouldn't make a mess all over my fingers. Then, I dipped an old toothbrush in some paint (I used black first) and ran my thumb over the bristles to produce "splatter." I would def recommend wearing gloves when you do this, even though I didn't in this picture:

(Here, I was running my thumb from the right to the left on the toothbrush, and I produced the black splatter shown on the paper below.)

After letting the black splatter dry, I repeated the process with the white acrylic paint. After that dried, I sealed everything with top coat and wiped the Vaseline off my fingers. I tried doing this method with black and white nail polish instead of acrylic paint, but I couldn't get a good splatter.

I also tried to make splatter by dabbing a mascara wand into some polish and tapping the wand on my nails:


This doesn't look like splatter, but I still think it ended up interesting.

Have you had success with splatter? If you have any tips, please share! 

Wednesday, September 18, 2013

ARTSY WEDNESDAY: Green

Ok, so I kind of cheated today. I've been in love with Rimmel Mintilicious, and so I really wanted to use it today, even though it's a minty-blue. It always comes out very blue in my pictures:


I sponged on Essie Stylenomics on my ring finger to make the gradient. (There's a good tutorial here on sponge gradients.) I then topped all my fingers with Revlon Stunning and NYC's matte top coat.

Unfortunately, as you can probably see, NYC's matte top coat doesn't work too well with lighter colors.

Check out what the other girls did this week:


Wednesday, September 11, 2013

Guest Post: Nail of the Day - Ombre and Stripes

I'm super excited today for two reasons: first, I'm halfway to my goal of 30 followers!!! Remember to enter my Stila Lip Glaze giveaway; I'll pick a winner once this blog reaches 30 followers on Bloglovin or GFC. Second, I have a GREAT guest post today from Steph of Fun Sized Beauty:

I know Anna is a huge fan of nail polish and nail art, so I thought I'd try my hand at something interesting! This nail look is a combination of a rainbow ombre and striping tape. 


Products Used: 

  • Maybelline - Porcelain Party 
  • Born Pretty Store -Striping Tape
  • Quo - Makeup Sponges
  • Julep - Renee
  • Forever 21 - Baby Blue
  • Cheeky Monkey - Tramp Stamp
How to get the look:
  1. Use a 2 coats of your favourite white polish. Make sure to let it dry completely before moving on to the next step.
  2. Place striping tape randomly criss-crossing over the nails.
  3. Paint one stripe of each Blue, Pink, and Purple over the sponge and pat the sponge over the nail. Apply more polish as needed and do the same patting motion on the other nails. For more detailed instruction on the ombre sponging see here.
  4. Quickly remove the striping tape with a pair of tweezers. Removing the striping tape will reveal crisp white lines underneath. 
Ta-da! Your striped ombre pastel nails are complete! 

Will you try out this nail look?

Aren't these great?! Thank you so much Steph for doing a guest post!! This is a great tutorial!!

Wednesday, September 4, 2013

ARTSY WEDNESDAY: Three colors

Today's theme was three colors:


I used Rimmel 60 Second Nail Polish in Mintilicious as the base, and Kiss Brush-on Nail Art Polish in White and Wet 'n Wild Tickled Pink on top. After letting my base coat dry, I dipped a wand in some white polish, and then brushed the wand against my nail from my finger tips back to the middle of my nail. Then, after the white dried, I did the same thing with Tickled Pink. For my ring finger, I just dipped the mascara wand in white polish and then randomly brushed it against my nail. I think it ended up looking interesting; I want to try it with light colors on a dark background and see if the design will pop more.

Check out what the other girls did this week:


Friday, August 30, 2013

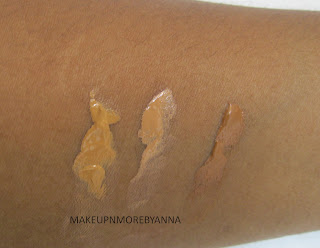
SWATCH & REVIEW: BB CREAMS: Smashbox, Too Faced, and Missha

I've been trying to clean my samples out, and so I finally got around to trying out Smashbox Camera Ready BB Cream in Dark and Too Faced's Tinted Beauty Balm in Beach Glow. I have an Asian one that one of my roommates gave me, Missha, to compare the American BB Creams to:

Missha B.B. Cream (Sorry, the bottle is messy.)

L-R: Too Faced Tinted Beauty Balm in Beach Glow, Missha B.B Cream in No. 31, and Smashbox Camera Ready BB Cream in Dark

Blended

I was interested in trying Smashbox and Too Faced's BB Creams because they offer the most coverage out of the American BB Creams. As you can tell by the blended swatch, they still do not offer near as much coverage as the Asian B.B. Cream, Missha, does. I actually use the Missha B.B. Cream as a concealer under my eyes; it doesn't crease and stays put for hours. It is also does not make my skin oily like traditional concealers do.

On to individual reviews of the American B.B. Creams:

Too Faced's Tinted Beauty Balm is probably my favorite American BB Cream! I am an NW35 in MAC, and Beach Glow was almost a perfect match! (It was a tiny bit light, but I would wear it anyway.) There was a bit of shimmer in it, and Too Faced's BB cream has a slightly dewy finish. The cream felt very light on my face, but it still evened out my skintone and did lighten up my dark circles a bit. This cream does offer enough coverage for me to wear if I was running errands, but probably not enough for me to wear it alone to class. The only con was that this cream did make my face feel a bit goopy after I ran errands for a few hours in the Texas heat. But I don't think it's realistic to expect a product to hold up well under 100-degree temperatures.

Smashbox's Camera Ready BB Cream was a bit disappointing. Dark was waaay too dark for me, and Medium was too light (if I remember right, it was too pink). This had less coverage than Too Faced's cream, but using two coats of this cream certainly improved the coverage. This BB cream did even out my skintone, and it fared much better in the heat--it did not become goopy at all! This BB Cream last me a good 5 hours. The biggest turn-offs were that this cream oxidized a bit, and it transfers easily. My face accidentally brushed up against a towel in my bathroom, and there was a dark spot of BB cream on the towel. So don't lay your cheek on your boyfriend's shoulder while wearing this!

Are there any BB Creams you would recommend trying? I am still interested in trying Sleek Makeup's Be Beautiful Blemish Balm if I can get a hold of it!


Sunday, August 25, 2013

How to Store Nail Art Stamping Plates

Sorry I haven't been posting as much!! I moved into my new apartment, and I JUST got internet!

So once I got my Bundle Monster stamping plates (which I recently reviewed), I realized that I didn't have a good way to store them!

I finally decided to cut circles that are as big as each plate out of light cardboard, and put them in between the plates:


The card board keeps the plates from scratching each other. (The plates are blue because I hadn't used these ones yet, and so they still had the blue film that came on them.) I then stacked the plates in a small, round container.

How do you store your plates? Has anyone else seen any good ideas for storing plates? I have heard of people storing them in photo albums, but if you have too many, the album gets too heavy.

Wednesday, August 21, 2013

ARTSY WEDNESDAY: Animation-inspired

When I first saw today's theme, I thought, Oh, no...what on EARTH am I going to do for this?? And then, I remembered my favorite show as a child, Sailor Moon, and I realized I could do nail art inspired by Sailor Moon! Sailor Moon follows a group of teenage girls who use wands to transform into magical warriors and fight magical beings from outer space. Each girl is named for a certain planet (i.e., there is Sailor Moon, Sailor Mars, Sailor Venus, etc.).

I based my nails on Sailor Jupiter's transformation:


These kind of ended up being galaxy nails, but I still enjoyed doing them because I've wanted to try galaxy nails. I used Essie Stylenomics as a base and sponged BK Neon Luminous Glow Polish in #06. (This was my first time using Stylenomics, and I still can't get over how dark it is!!! It looks ldark green in the bottle, but on my nails, it looks almost black!) I used BK Neon Luminous Glow Polish in #03 for the dots. 

I based my accent finger on her transformation wand (you can see it in the first gif above).  I used Sally Hansen Big Money as the base and Stylenomics for the circle. Unfortunately, I can't tell you the name of the yellow I used for Jupiter's symbol (the "4"). I bought it at a seedy little dollar store once when I needed a yellow polish, and the name has rubbed off the bottle.  

I'm excited to see what everyone else did this week:

Friday, August 16, 2013

REVIEW: Bundle Monster 2010 Nail Plate Collection

I finally got a set of stamping plates! I decided to get a Bundle Monster plate set and a Konad stamper.


I was surprised how small stamping plates are:


I really like some of the designs in the set (like the baroque pattern I used for my designer-inspired nails), but I'm not so crazy about others (when am I ever going to use a marijuana leaf?). Also, I wish there were more full-nail designs and patterns.


Pictures from Amazon

I first tried all of the designs to make sure they transferred correctly, and I had to get replacements for nine of the plates. Bundle Monster's customer service was quick to respond and send the replacement plates, but I was disappointed that one of the replacement plates came scratched. :( However, once I got the replacement plates, almost all the designs transfer beautifully. The only ones that did not work as well were the tiny tiny details, like the smallest hearts (BM 3 and 17).

Also, don't worry about getting the nail polishes they sell for stamping; Wet n Wild polishes worked great with these plates!

If you have the time and patience to exchange dud plates, I would definitely recommend getting this set. It is one of the cheaper sets ($17.99 for 21 plates). I was fine getting a cheaper set of plates and having to e-mail Bundle Monster about dud plates.


Have you tried stamping plates yet? What set did you get? I'd love to hear more about other brands!!

Saturday, August 10, 2013

SWATCH & REVIEW: Rimmel Mintilicious + Similar Colors

A couple of weeks ago, I visited my sister and fell in love with Julep Dianna while going through her nail polish. I HAD to have a similar minty-blue color, and so I got Rimmel 60-Second Nail Polish in Mintilicious:


This color is slightly bluer than Julep's Dianna. (I had issues getting the color in the picture to match the actual polish; this swatch is the closest match I've seen.)

I did 2 coats here. This polish did, indeed, dry very quickly, which was nice. The polish was a little bit thick, and when I applied it, brush marks would show easily. NYC's top coat evened out the color and covered any bumps, though.The other downside was that the brush is a little fatter than I would have liked, and it made it hard to paint neatly. However, this polish was just $1.69, and so I'm still really happy with the polish.

Make sure you use a base coat with this! I used my PVC peelable base coat, and Mintilicious stained my nails a little bit. :(

Have you tried out any minty-blue polishes?  I have also seen minty-blue polishes by Essie (Turquoise & Caicos), Sally Hansen (Jaded; it's a bit greener than the others), and Revlon (Eclectic). If anyone has these, I'd love to know how their formulas compare to Minitilicious and Dianna!

Wednesday, August 7, 2013

ARTSY WEDNESDAY: Blue

Today's theme was blue. I had wanted to try using Sally Hansens's Mermaid's Tale in nail art, and I thought this was a great time to try:


Here, I used it with BK- Neon Luminous Glow Polish #6. After using Mermaid's Tale as the base, I used striping tape to create the stripes, and I did the flower on my fourth finger with a brush.

Check out the other girls' blue manis:

Friday, August 2, 2013

Stila Lip Glaze Giveaway!!!


I decided to do a giveaway in celebration of moving to a new blog!! Once I hit 30 followers on GFC or Bloglovin', I will pick a winner, and the winner will receive 2 Stila lip glazes in Black Cherry and Jolly! This giveaway is open internationally so everyone can enter!!


These lip glazes were purchased with my own money. You must be a follower on at least one of the following to win: GFC, Bloglovin', Pinterest, Facebook, or Twitter. Once this blog hits 30 followers (on GFC or Bloglovin'), a winner will be chosen. I will e-mail the winner, and the winner will have 48 hours to reply and claim their prize. I will not be responsible if the package is lost or damaged once the prize is mailed.

Tuesday, July 30, 2013

Welcome To My New Home!!

Welcome to Makeup n More by Anna, my new blog! I'm excited to continue blogging from here. :)

Follow my blog with Bloglovin

Monday, July 29, 2013

RECIPE REVIEW: Thai Hot-and-Sour Soup

It was really rainy and dreary here last week, and so I decided to make some hot-and-sour soup:


I got the recipe from the book Perfect Thai, again. This tasted delicious and was super easy to make!! The only things I had to chop were a few small green chillies and some water chestnuts, and then I dumped these in a pot of boiling vegetable stock with some mushrooms, rice noodles, lemongrass, soy sauce, lime juice, a bit of sugar, and rice vinegar. The best part about this recipe: There was practically no cleaning up to do afterwards! I just had to wash the knife I used to chop things and the pot I boiled everything in!

The other good part about the soup is that it isn't fatty, and so it is filling without being too heavy. It's perfect for if you have an upset stomach.

Are there any easy recipes that you like? I would love to try out some new recipes!!

Friday, July 26, 2013

SWATCH & REVIEW: Julep Taylor and Julep Meryl

I have a quick post today. I just wanted to share swatches of two more Julep colors that I borrowed from Haylee. I don't think I've ever seen a Julep color that I didn't like. The formula on both of these was great, too. They both were completely opaque in 2 coats.

First is Julep Taylor:


I used this one as the base for the flower manicure I did as a guest post for Fun Size Beauty. It's such a nice, bright blue--I love using colors like this on my toes.

Next is Meryl:


Meryl is a pretty standard grey creme polish, but I really love this polish because of its great formula.

What are your favorite Julep colors? Haylee went on a spending spree and bought a bunch of Julep polishes, so I'm looking forward to playing with those when I go visit her next week!

Wednesday, July 24, 2013

ARTSY WEDNESDAY: Designer-inspired

Today's theme was designer-inspired. I was inspired by this gorgeous Monique Lhuillier dress:


I was pleased that my idea for my nails panned out:


I used Wet n Wild Shine Black Creme as the base, and used paper reinforcements to make the half-moons. [There's a great tutorial here.] I used Wet n Wild Shy on top of the black. Last, I used one of my new Bundle Monster stamping plates, BM-20, to stamp the design on top of my half-moon manicure. 

This was my first time doing a half-moon manicure with paper reinforcements, and I learned how important it is not to use a thick polish for your top color. If the polish is too thick, then it's hard to get a clear half-moon. Also, if you accidentally put too much polish on your nail, you also don't get pretty half-moons. This was also my first time using my stamping plates; I plan on doing a review of the plates soon, and I'll include some tips on stamping there, too. Also, let me know if you would like a more detailed tutorial of this!

Be sure to check out the other girls' designer-inspired manis:


Tuesday, July 23, 2013

HAUTELOOK: Laura Geller and OPI Sales

Hautelook is having a sale on Laura Geller items right now!


                                                               screenshot from hautelook.com

Hautelook is also having a sale on OPI that starts tomorrow at 8 AM PST. I'm super excited to see what they have!

Thursday, July 18, 2013

SWATCH & REVIEW: Bare Minerals Marvelous Moxie Lipstick in Make Your Move

After hearing such marvelous things about the Marvelous Moxie Lipsticks online (haha, I promise I didn't do that on purpose), I was super excited to try them out for myself. One of my friends had Make Your Move, and I borrowed it one day to try it out:


Make Your Move is a pink-brown shade, and it was a pretty neutral shade on me. These lipsticks are just as wonderful as everyone says. Make Your Move was pigmented enough to even out the uneven coloring of my lips. This lipstick is very creamy; you have to apply it in one swipe. If you try doing multiple swipes, the color can get splotchy. These lipsticks are also as long-lasting as everyone says: after 4 hours and one meal, the lipstick was still there!! It was great!

One con to the Marvelous Moxie lipsticks is that there are not that many work for darker skin. If you love rocking bright shades, then you'll love the selection, but since I love neutrals and am kind of picky with what colors I like, I couldn't really find any that I liked besides Make Your Move. The other con is that these lipsticks do melt easily, and so I would advise not leaving it in your purse and definitely not in your car. When I was testing out these lipsticks, I heard the woman beside me complaining that her Marvelous Moxie lipstick melted when she left it in her purse, but all her other lipsticks were still fine.

Have you tried Marvelous Moxie lipsticks yet? What'd you think?!


Tuesday, July 16, 2013

SWATCHES & REVIEW: Merle Norman Purely Mineral Eye Pencil in Dark Brown

Today I have another Merle Norman products to show you guys - Merle Norman's Purely Mineral Eye Pencil in Dark Brown:


I have a sample pencil, which is why it is small. The actual pencil also comes with a built-in smudger.


The pencil glides smoothly onto your eyes with no tugging. The pencil is also very pigmented, and it does not travel. When I wore it in LA, the liner stayed on all day. I was a bit bummed when I went to Phoenix, though, and the pencil didn't last as long because of the heat and humidity, but...what product does? I don't wear this pencil nearly as much as I should because I like lining my eyes in black, but if you have fair skin or think black looks a bit harsh, this could be a nice pencil for you.